First Boot on AWS
Garden Linux is a minimal, security-hardened Linux distribution designed for cloud and container environments. This tutorial guides you through deploying your first Garden Linux instance on AWS EC2, from selecting an Amazon Machine Image (AMI) to connecting via SSH.
Difficulty: Beginner | Time: ~15 minutes
Learning Objective: By the end of this tutorial, you'll have a running Garden Linux instance on AWS and understand the basic deployment process.
Prerequisites
Before starting, you'll need:
- An AWS account with appropriate permissions to create EC2 instances, VPCs, and security groups
- AWS CLI installed and configured with your credentials
- Basic familiarity with EC2 concepts
- An SSH client on your local machine
What You'll Build
You'll deploy a Garden Linux instance on AWS EC2 with a basic networking setup (VPC, subnet, internet gateway, and security group), configure SSH access, and verify the installation. The tutorial uses the gardener_prod flavor, which is optimized for production workloads.
Steps
Step 1: Choose an Image
Garden Linux provides pre-built AMIs for multiple AWS regions. Start by selecting an appropriate image for your deployment.
Official Images
Choose a release from the GitHub Releases page. For this tutorial, we'll use release 2150.0.0.
In the "Published Images" section on the release page, find the AMI ID for your desired flavor, architecture, and region. The default production flavor is aws-gardener_prod-amd64.
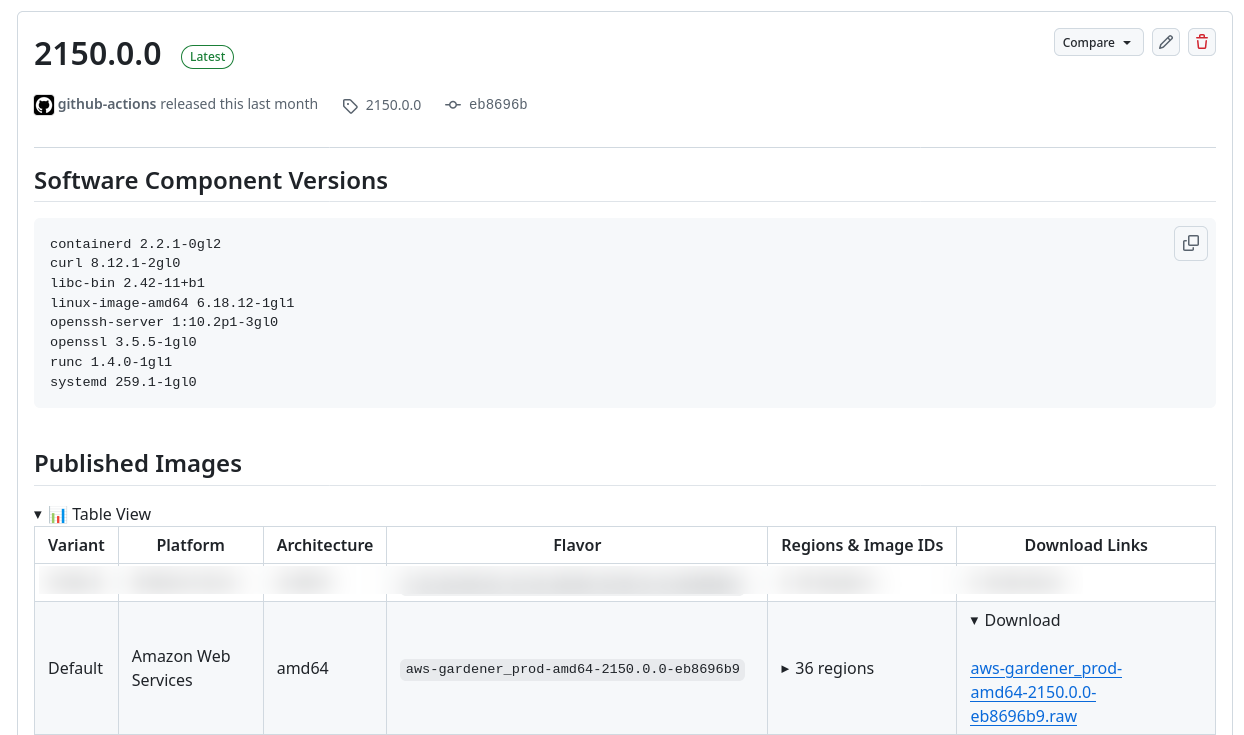
For this tutorial, we'll use the eu-central-1 region. Replace the AMI ID below with the one corresponding to your chosen region:
AMI_ID="ami-0f502b80bb47d34b3"TIP
For a complete list of maintained releases and their support lifecycle, see the releases reference.
Build Your Own Images
To create custom Garden Linux images with additional features or configurations, see the Building Flavors guide.
Step 2: Prepare Your AWS Environment
Before launching your Garden Linux instance, set up the necessary AWS networking infrastructure. This step creates a Virtual Private Cloud (VPC), subnet, internet gateway, and security group.
Create a VPC
Create a VPC to isolate your Garden Linux instance in a dedicated network environment:
AWS_REGION="eu-central-1"
VPC_CIDR="10.1.0.0/18"
VPC_ID=$(aws ec2 create-vpc \
    --cidr-block $VPC_CIDR \
    --output text --query 'Vpc.VpcId')
Create a Subnet
Create a subnet within the VPC where your instance will be placed:
SUBNET_CIDR="10.10.0.0/22"
AZ=$(aws ec2 describe-availability-zones \
    --query 'AvailabilityZones[].ZoneName' \
    --filter "Name=state,Values=available" \
    --output text | tr -s '\t' '\n' | head -1)

SUBNET=$(aws ec2 create-subnet \
            --vpc-id $VPC_ID \
            --availability-zone $AZ \
            --cidr-block ${SUBNET_CIDR} \
            --query 'Subnet.SubnetId' \
            --output text)
Create an Internet Gateway
Create and attach an internet gateway to enable public internet access for your instance:
IGW_ID=$(aws ec2 create-internet-gateway \
    --query 'InternetGateway.InternetGatewayId' \
    --output text)

aws ec2 attach-internet-gateway \
    --vpc-id $VPC_ID \
    --internet-gateway-id $IGW_ID

ROUTE_TABLE_ID=$(aws ec2 describe-route-tables \
        --filters "Name=vpc-id,Values=$VPC_ID" \
        --query 'RouteTables[].RouteTableId' \
        --output text)

aws ec2 create-route \
    --route-table-id $ROUTE_TABLE_ID \
    --destination-cidr-block 0.0.0.0/0 \
    --gateway-id $IGW_ID
Create a Security Group
Create a security group to control network access to your instance. This configuration allows all traffic between instances in the same security group and SSH access from your current public IP:
SECURITY_GROUP_ID=$(aws ec2 create-security-group \
    --vpc-id $VPC_ID \
    --group-name gardenlinux-tutorial \
    --description "Allow SSH Access for Garden Linux Tutorial" \
    --query 'GroupId' \
    --output text)

aws ec2 authorize-security-group-ingress \
    --group-id $SECURITY_GROUP_ID \
    --protocol all \
    --port 0 \
    --source-group $SECURITY_GROUP_ID \
    --output text

aws ec2 authorize-security-group-ingress \
    --group-id $SECURITY_GROUP_ID \
    --protocol tcp \
    --port 22 \
    --cidr $(curl -s ifconfig.me)/32 \
    --output text
Step 3: Configure SSH Access
Generate an SSH key pair and create a user-data script to enable SSH on first boot.
Garden Linux SSH Default
Garden Linux disables SSH by default for security. You must explicitly enable it using cloud-init user-data when launching the instance.
KEY_NAME="gardenlinux-tutorial-key"
ssh-keygen -t ed25519 -f $KEY_NAME -N ""

aws ec2 import-key-pair \
    --key-name $KEY_NAME \
    --public-key-material fileb://$KEY_NAME.pub

USER_DATA=user_data.sh
cat >$USER_DATA <<EOF
#!/usr/bin/env bash

# Enable SSH service on first boot
systemctl enable --now ssh
EOF
Step 4: Launch the Instance
Launch your Garden Linux EC2 instance with the prepared configuration:
aws ec2 run-instances \
        --image-id $AMI_ID \
        --subnet-id $SUBNET \
        --instance-type t3.small \
        --user-data file://$USER_DATA \
        --associate-public-ip-address \
        --security-group-ids $SECURITY_GROUP_ID \
        --key-name $KEY_NAME \
        --count 1 \
        --tag-specifications "ResourceType=instance,Tags=[{Key=Name,Value=gardenlinux-tutorial}]"
Step 5: Connect to Your Instance
Wait a few moments for the instance to boot, then retrieve its public IP address and connect via SSH:
INSTANCE_IP=$(aws ec2 describe-instances \
    --filters "Name=tag:Name,Values=gardenlinux-tutorial" \
    --query 'Reservations[].Instances[].PublicIpAddress' \
    --output text)

ssh -i $KEY_NAME ec2-user@$INSTANCE_IP
TIP
Garden Linux uses ec2-user as the default SSH username on AWS, consistent with Amazon Linux conventions.
Step 6: Verify the Installation
Once connected, verify your Garden Linux installation with the following commands:
# Check OS information
cat /etc/os-release

# Verify kernel version
uname -a

# Check system status
systemctl status

# View network configuration
ip addr show
Expected output from /etc/os-release should show:
NAME="Garden Linux"
VERSION="2150.0.0"
ID=gardenlinux
...
Success Criteria
You have successfully completed this tutorial when:
- Your Garden Linux instance is running on AWS
- You can connect via SSH
- You can verify the Garden Linux version using
cat /etc/os-release
Cleanup Resources
When you're finished with the tutorial, remove all created resources to avoid ongoing costs. The cleanup process must follow a specific order due to dependencies between resources:
# Terminate the EC2 instance
aws ec2 terminate-instances \
    --instance-ids $(aws ec2 describe-instances \
        --filters "Name=tag:Name,Values=gardenlinux-tutorial" \
        --query 'Reservations[].Instances[].InstanceId' \
        --output text)

# Wait for the instance to fully terminate before proceeding
aws ec2 wait instance-terminated \
    --instance-ids $(aws ec2 describe-instances \
        --filters "Name=tag:Name,Values=gardenlinux-tutorial" \
        --query 'Reservations[].Instances[].InstanceId' \
        --output text)

# Delete the security group
aws ec2 delete-security-group \
    --group-id $SECURITY_GROUP_ID

# Delete the AWS key pair
aws ec2 delete-key-pair \
    --key-name $KEY_NAME

# Detach the internet gateway before deleting it
aws ec2 detach-internet-gateway \
    --vpc-id $VPC_ID \
    --internet-gateway-id $IGW_ID

# Delete the internet gateway
aws ec2 delete-internet-gateway \
    --internet-gateway-id $IGW_ID

# Delete the subnet
aws ec2 delete-subnet \
    --subnet-id $SUBNET

# Delete the VPC
aws ec2 delete-vpc \
    --vpc-id $VPC_ID

# Remove local files
rm $USER_DATA $KEY_NAME $KEY_NAME.pub
Next Steps
Now that you have a running Garden Linux instance on AWS, you can:
- Explore AWS platform-specific features and configurations
- Discover how to build custom Garden Linux images with additional features